Overview
The XML and CSV Import addon allows you easily import products from any XML, CSV, JSON or YML file to your CS-Cart store. Save yourself hours with this add-on and make inventory management hassle free. With the XML Import add-on, your product data will be sent to your store keeping you ahead of your competitors with the newest products. You can be sure the product stock quantities are always up-to-date. The add-on allows you to automatically update product catalogs including changes to prices, inventory stock quantities, and new product additions.
An easy field mapping feature allow you to easily overcome the divergent data formats of suppliers and synchronize only the appropriate data fields to your store.
Download
an example CSV file.The add-on also enables you to import XML files with the YML (Yandex Market Language) format.
Download
an example YML file.To import a XLSX file, save it as CSV and import the CSV file.
The XML and CSV Import add-on makes the complicated import tasks simple and fast.
Fields you can import
1. Product fields
- Product name
- Product code
- Price
- Currency
- Category
- External category id
- External category parent_id
- External category parent name
- Secondary categories
- List price
- Status
- Quantity
- Weight
- Min quantity
- Max quantity
- Quantity step
- List qty count
- Shipping freight
- Date added
- Downloadable
- Language
- Files
- Ship downloadable
- Inventory tracking
- Out of stock actions
- Free shipping
- Zero price action
- Detailed image
- Additional images
- Description
- Short description
- Meta keywords
- Meta description
- Search words
- Page title
- Promo text
- Taxes
- Available since
- SEO name
- Product type
- Parent product id
- Variation options
- Variotion group code
- Variation set as default
2. Product options
3. Product features
Select Variations as separate products option in the target feature settings in order to import variations correctly. The name of the first product of the group will be repeated for all products of the group, in case the Variations as one product option is selected.
Features
- Seamlessly import data in the XML, CSV, and YML formats.
- Quickly upload and sync your product data including new products.
- Keep up with pricing and inventory changes.
- Enjoy the fields mapping and category mapping features.
- Control the fields to be imported with presise setting of the main fields
- Import products automatically by a cron script.
- Clone import profiles.
- Allow/forbid administrators to manage import.
- Modifi the imported data (using standart Advanced Products Import addon)
- Import common products for vendors (Common Products for Vendors add-on support)
- Convert the currency during importing
- Seamlessly import data in the XML, CSV, JSON and YML formats.
Compatibility
The add-on is compatible with CS-Cart and Multi-Vendor 4.10.1 and above. PHP 7.1 and higher is required.
Support
This add-on is developed and published by Simtech Development Ltd., a CS-Cart developer. You are guaranteed a quality add-on supported by the future versions.
Demo
Check out the XML and CSV Import add-on in our demo store.
Managing in the admin panel
Installing the add-on
Install the XML and CSV Import add-on on the add-ons list page (Add-ons → Manage add-ons). Click the + button in the top right corner, select an archive and click Upload & install. You can now find the installed add-on in the list of installed add-ons, just make sure it is set to Active.
Setting up the add-on
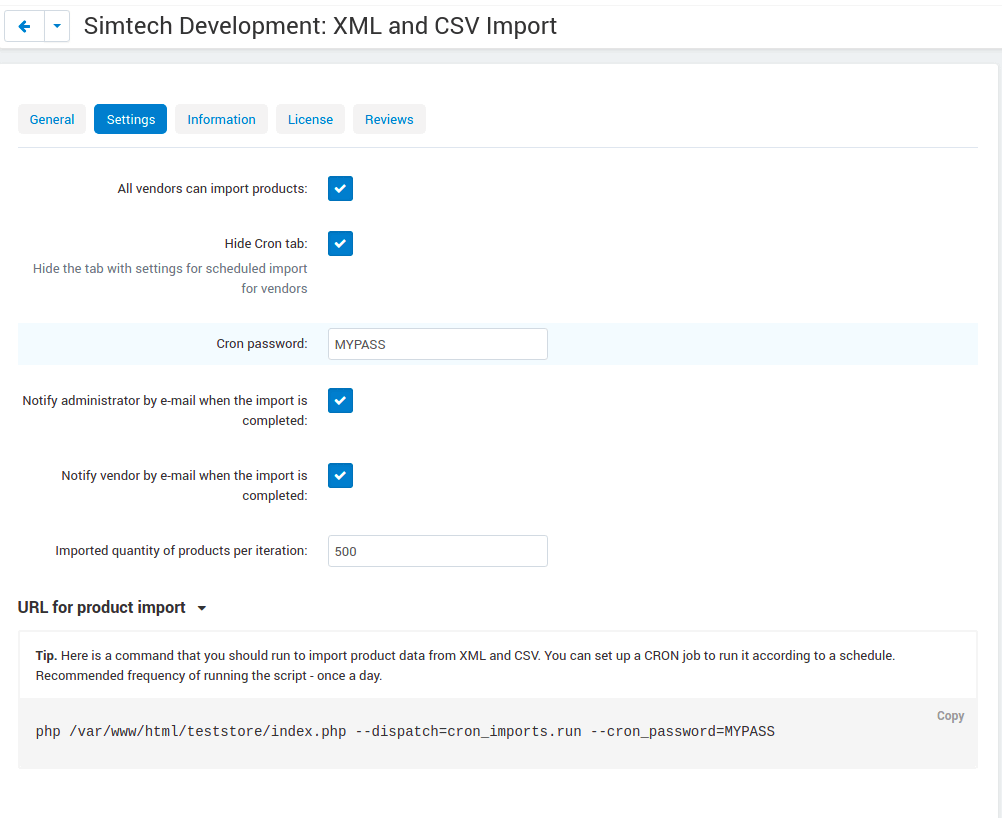
- License key— liecence key of the product.
- All vendors can import products—If enabled, vendors will be able to import products to the store.
- Hide Cron tab—When switched on, the tab with the sittings for sceduled import is hidded for vendors.
- Cron password—Enter a cron password that will be used to set up a cron script.
- Notify administrator by e-mail when the import is completed—If enabled, the administrator will be notified of the completed import when it is made by cron.
- Notify vendor by e-mail when the import is completed—If enabled, the vendors will be notified of the completed import when it is made by cron.
- Imported quantity of products per iteration-Allows to alter the quantity of the products to be imported per iteration.
- URL for product import—Use this link to run import by cron. For example, you can import the whole catalog every 24 hours and update prices and stock every 5 minutes.
Use the following command:
php /path/to/cart/snikers.php --dispatch=run_import_xml.import --cron_password=MYPASSwhere:
path/to/cart is the path to the root store directory
cron_password is the access key to cron script that you should take from the Cron password field.
Importing data
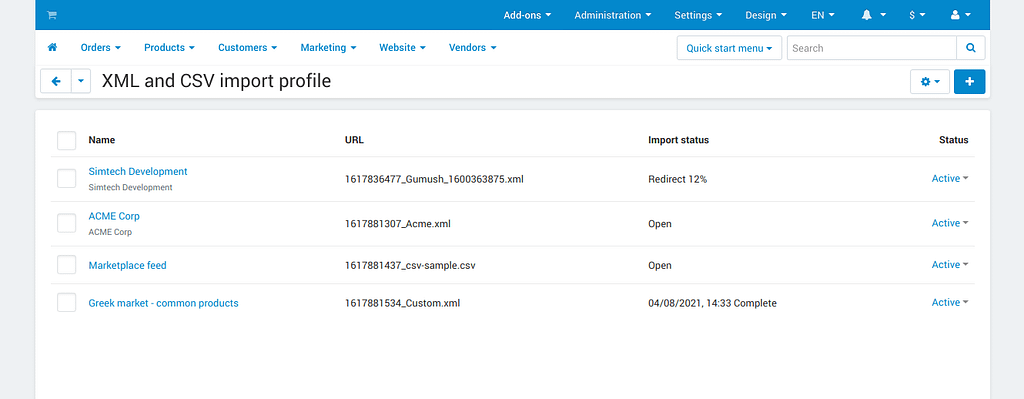
The add-on creates a new XML and CSV import profile page, where you can see a list of all created profiles with the ability to delete, edit, add, and import profiles.
You can also see the import status:
- Open—Means that an import profile has been created, but has not been imported yet.
- Complete—Means that the import has been completed.
- In progress—Means that the import is now running.
- Redirect—Means that the first 1000 products have been imported. To complete import, run the import again.
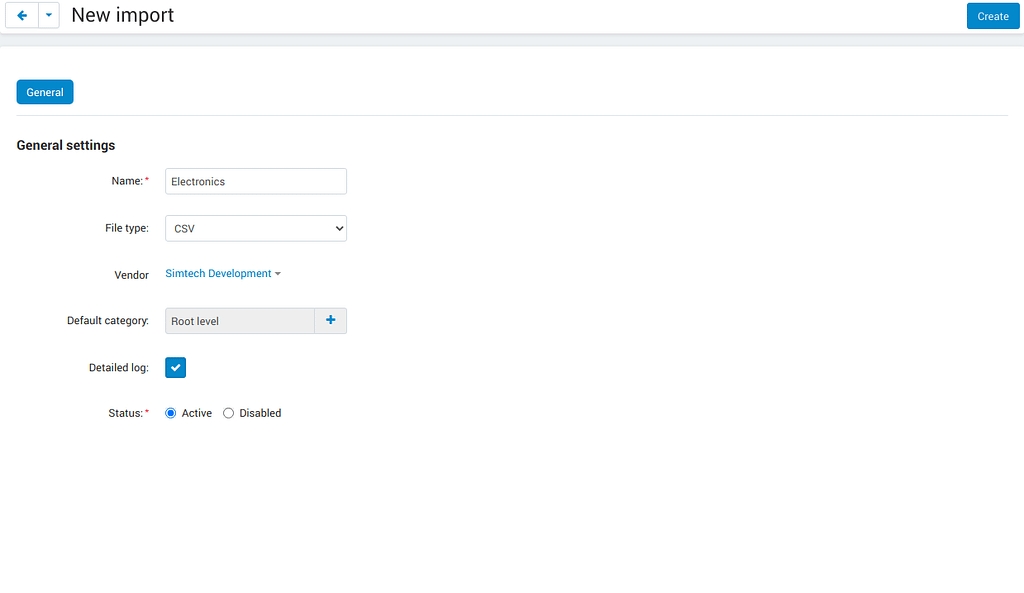
To import products, follow these steps:
- Click the + button to add a new import profile.
- In the General tab, enter a name for the import profile and choose the type of the file you are going to import.
Note
To import CSV files, please use Open Office or Libre Office Calculator. Microsoft Excel uses Windows-1251 character set while CS-Cart uses UTF-8 character set. There might be an error during the import if you are using MS Excel.
To import a XLSX file, save it as CSV and import the CSV file.
- Click Create.
- Switch to the Options tab and configure the following settings:
Display example with selected CSV file type for import:
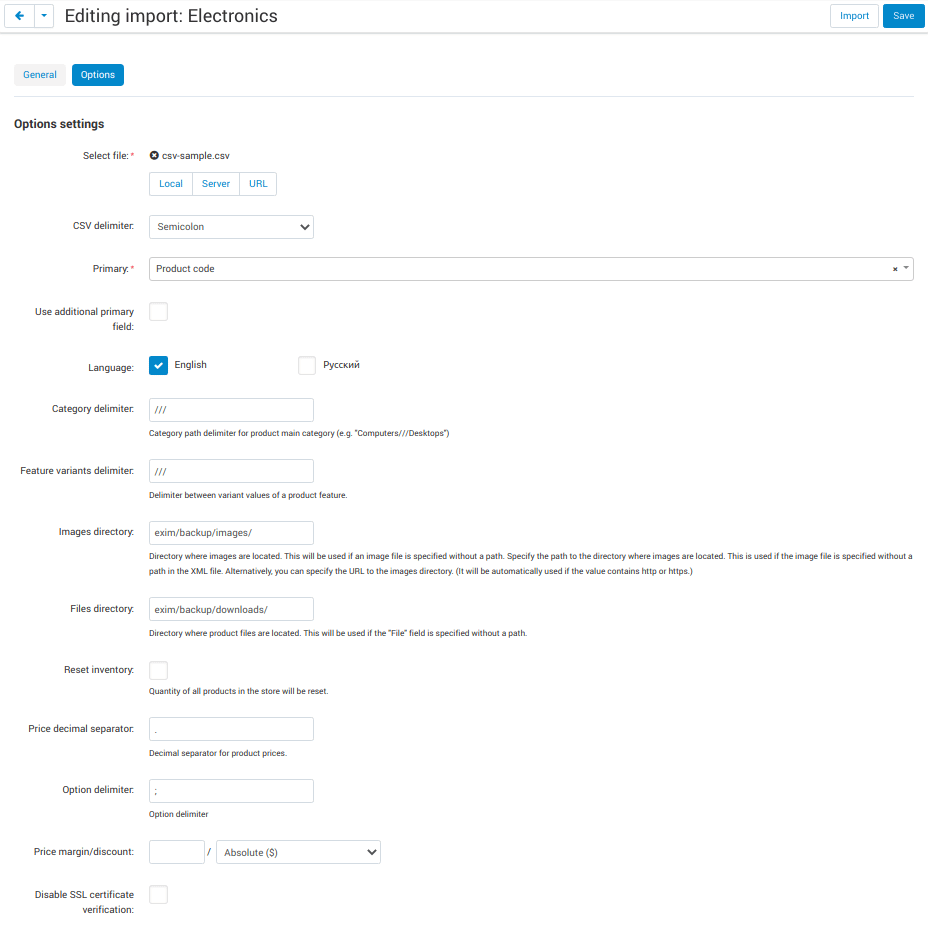
Select file—Choose location of the XML or CSV file with the import data and select this file.
CSV delimiter—Choose the delimiter in import file
Primary—Choose the primary field of the product. Available options: Product name, Product code, Features
Use additional primary field—Adds the option to choose and use the additional primary product field for importing. When switched on the additional primary field becomes required to fill.
Additional primary field—Additional primary product field for product identification Available options: Product name, Product code, Features
Primary fields check method—Two options are available to choose. All: the select is made by the primary and additional fields at once. Cascade: the selection is performed first by the primary field, then by the additional one
Product fields that are meant to define the product from the list are considered to be the primary field in such context. For instance: SKU, GTIN, MPN, EAN, EAP etc.
Language—Select one of the enabled languages in the store.
Category delimiter—Select the delimiter of the category path which is used in the file.
Feature variants delimiter—Select a feature variants delimiter that is used in the file.
Images directory—Directory where images are located. This will be used if an image file is specified without a path. Specify the path to the directory where images are located. This is used if the image file is specified without a path in the file. Alternatively, you can specify the URL to the images directory. (It will be automatically used if the value contains http or https).
Files directory—Specify the path to the directory where product files (for downloadable products) are located. This is used if the File field data is specified without a path in the file.
Reset inventory—Quantity of all products in the store will be reset.
Price decimal separator—Type a decimal separator for product prices that is used in the file.
Option delimiter—Type a separator for option delimiter that is used in the file.
Price margin/discount—Specify a discount or margin in percentage or a fixed amount.
Disable SSl certificate verification—Allows to switch off the SSL-certificate check.
- Click Save.
- If you are importing a YML file or an XML file with containers, you will see the Containers tab. Otherwise, skip this step.
In the Containers tab, define the following settings:
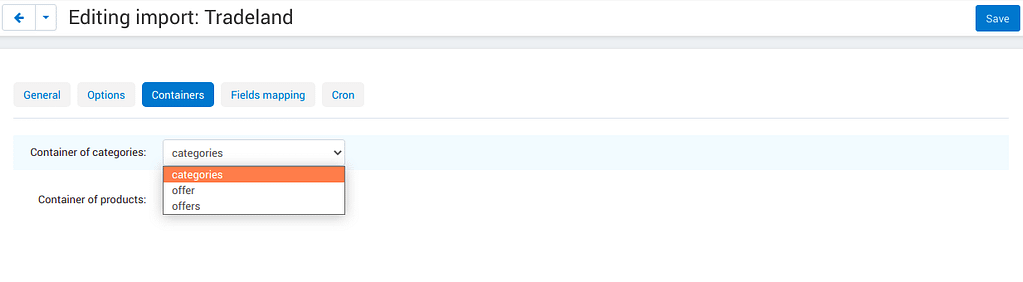
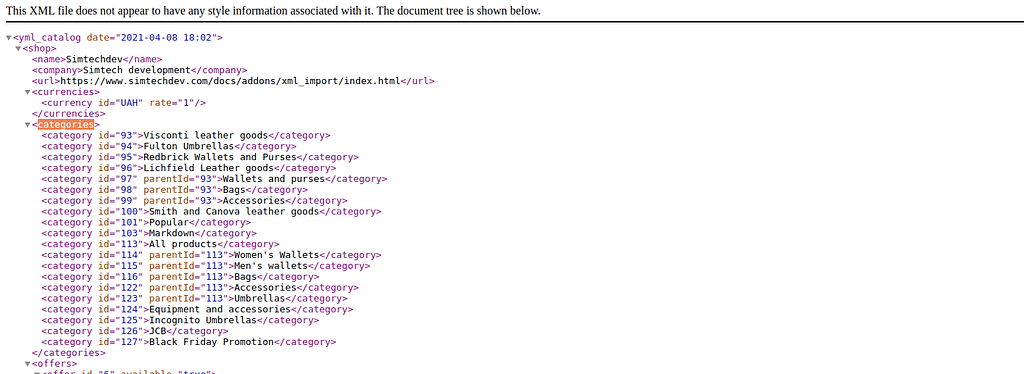
- Container of categories—Select the container that consists of product categories in the file to be imported. The drop-down list will have all containers from your file.
Have a look at this example. As you can see, the <categories> container consists of product categories.
- Container of products—Select the container that consists of products in the file to be imported. The drop-down list will have all containers from your file.
Example:
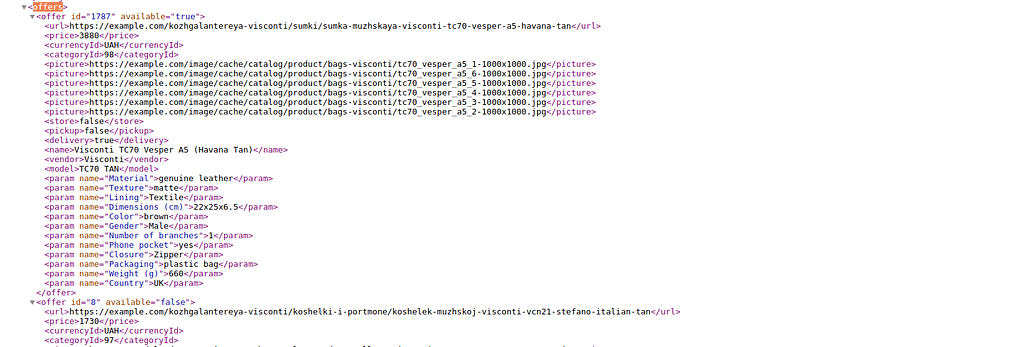
The <offers> container contains products in this file.
Categories—Product categories
Offers—Products
Offer—Specific product
- Click Save again to make further settings appear.
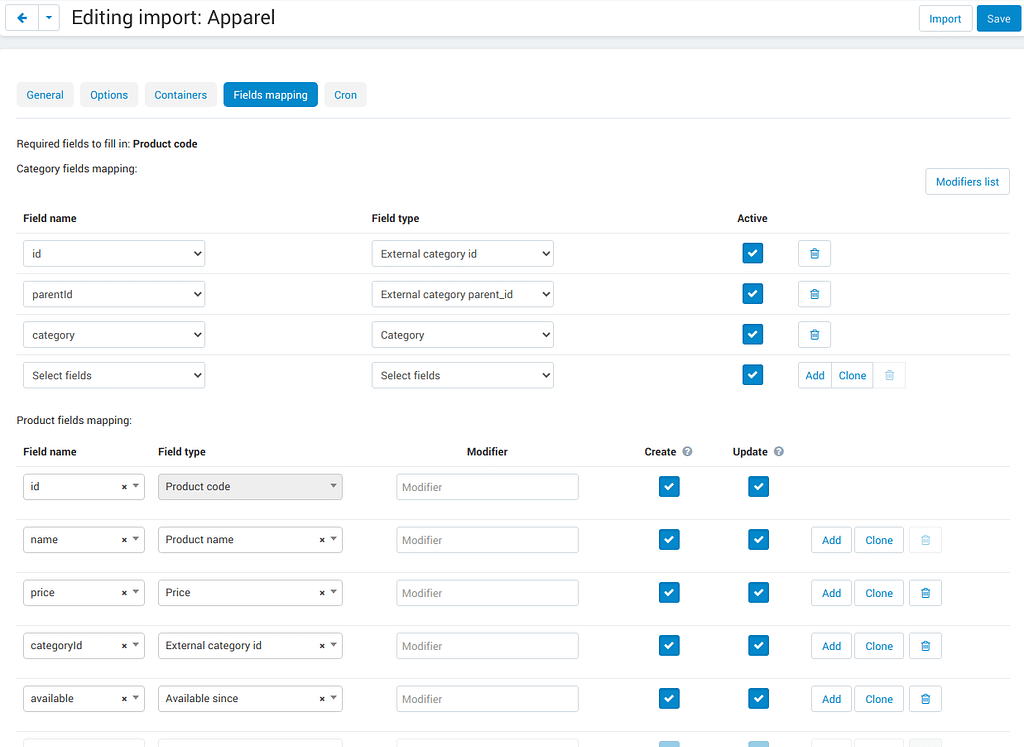
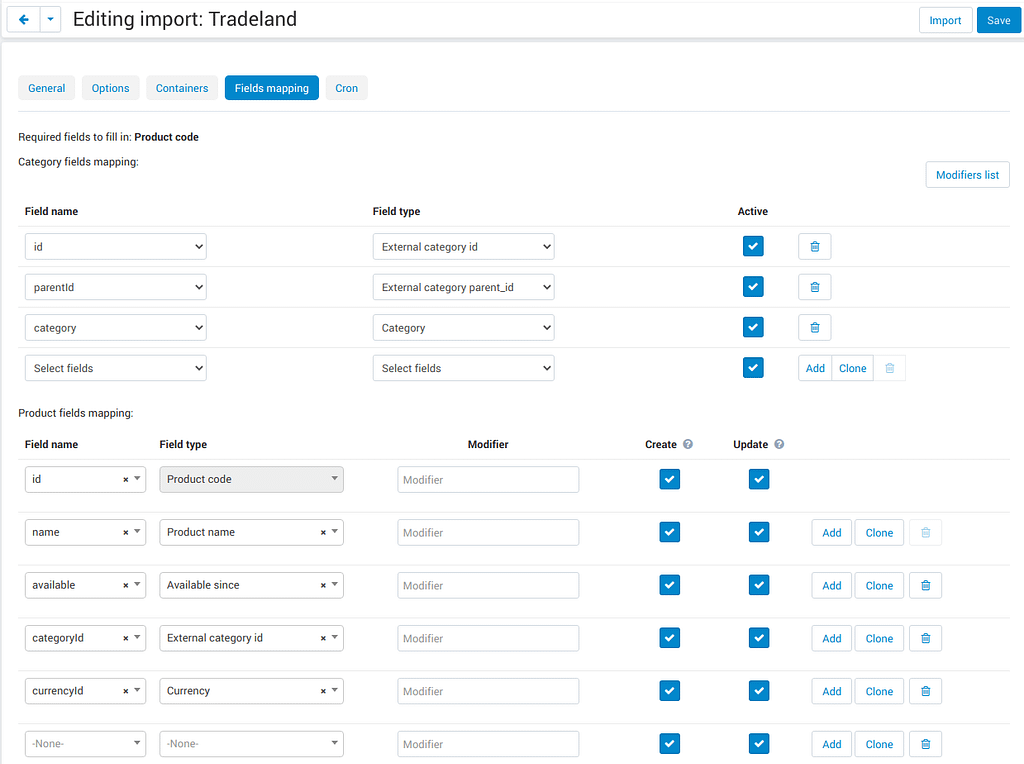
- In the Fields mapping tab, arrange a list of fields included in the data feed. Each field has the following attributes:
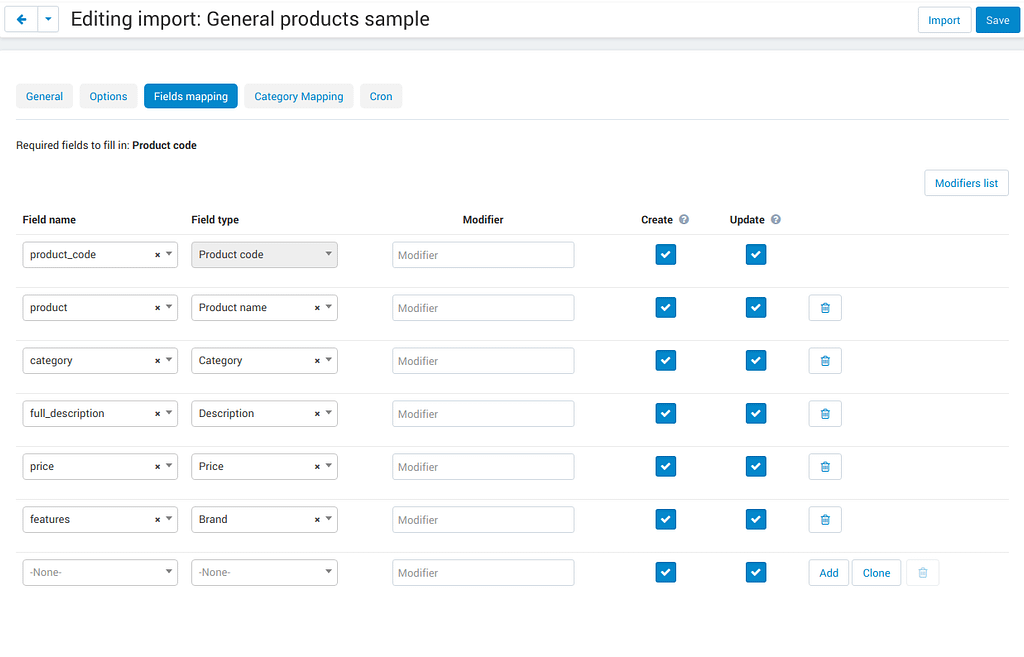
Field name—Name of the field.
Field type—Meaning of the data in the field.
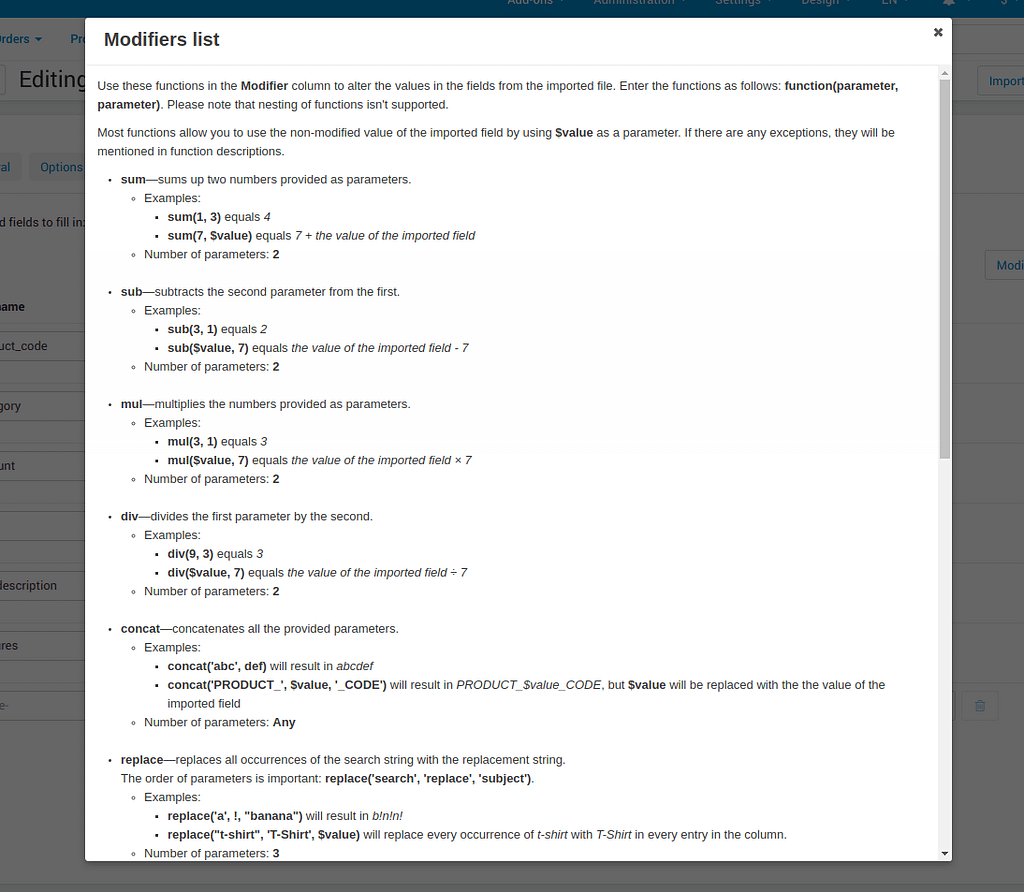
Modifier—Functions that alter the importing data. Modifiers list button will show all modifiers and the ways of their use. The functionality of the standard Advanced product import add-on is used. Learn more.
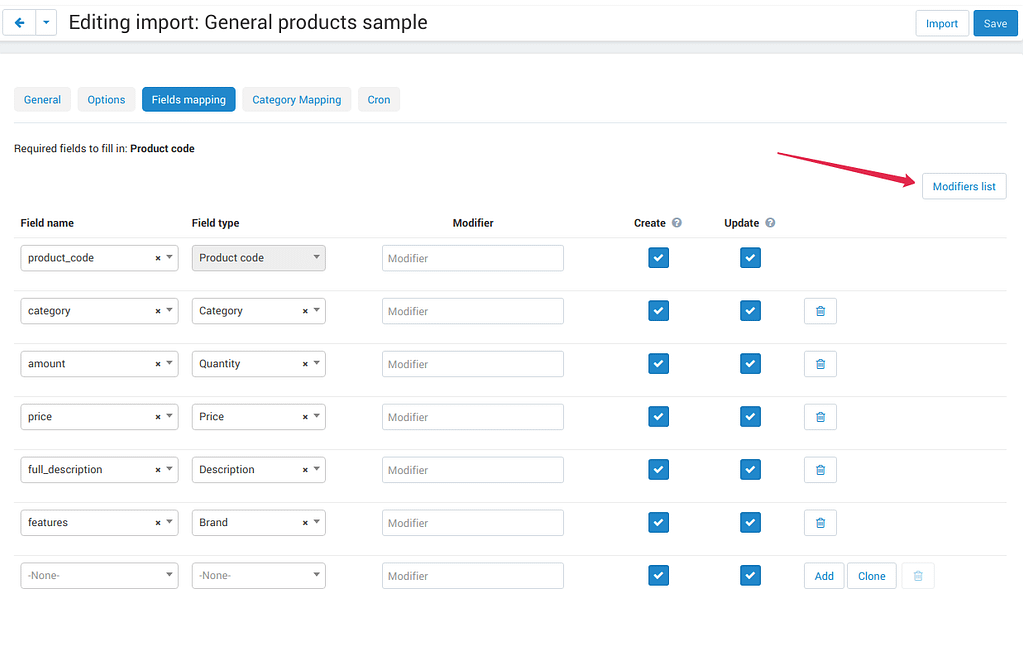
Create—Tick the checkboxes next to the fields you want to import for new products.
Update—Tick the checkboxes next to the fields you want to update for existing products.
For YML and XML files with containers, also do the product fields mapping.
- In the Category mapping tab, you can match product categories from the import file with product categories in your store. Link categories manually if they were not linked automatically.
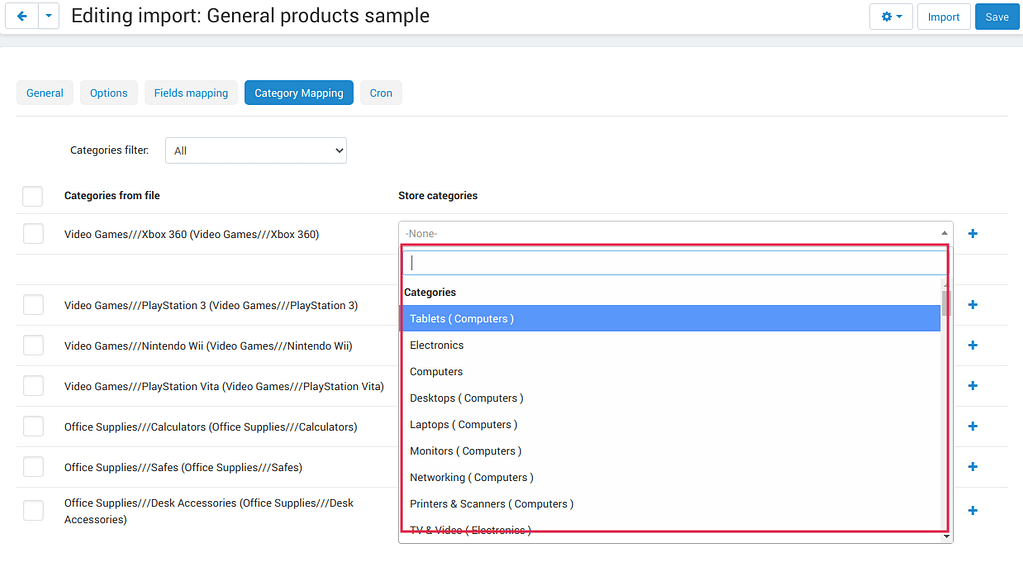
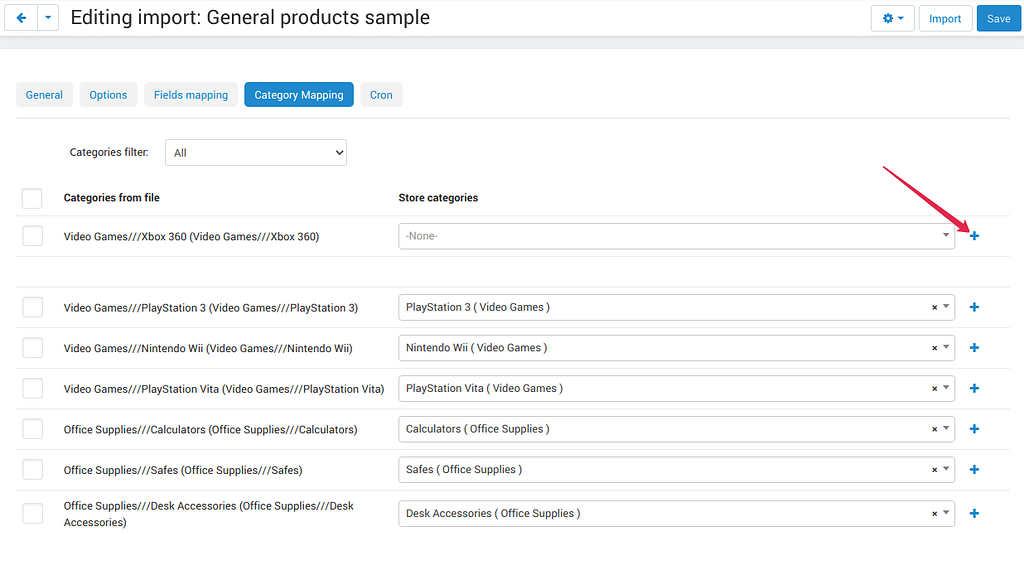
You can also quickly link and create multiple categories using the bulk editing feature.

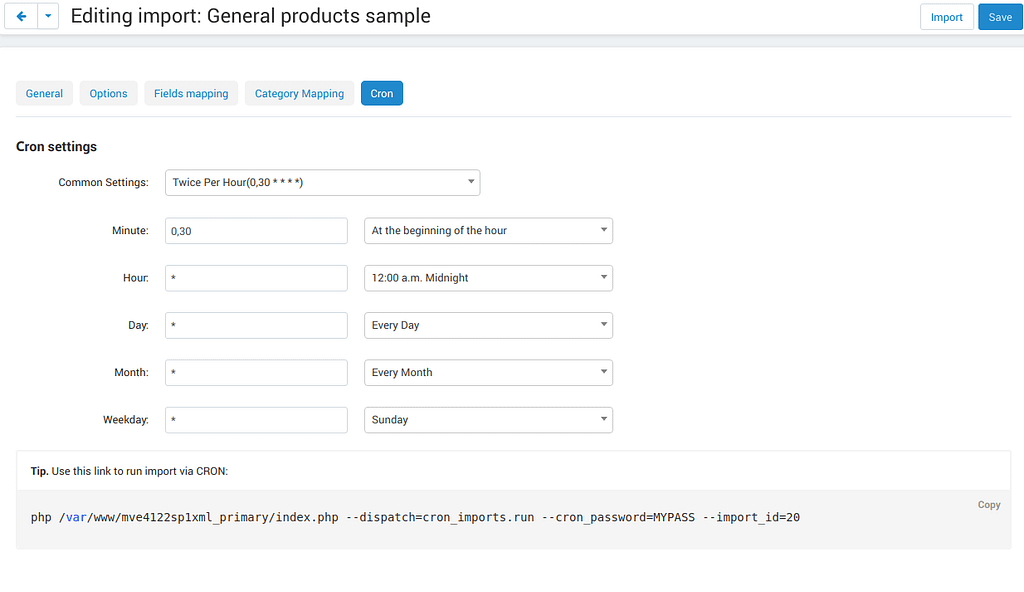
- The Cron tab contains the command that you can run to make import start automatically according to a schedule. You can select one of the preset periods, or define your own.
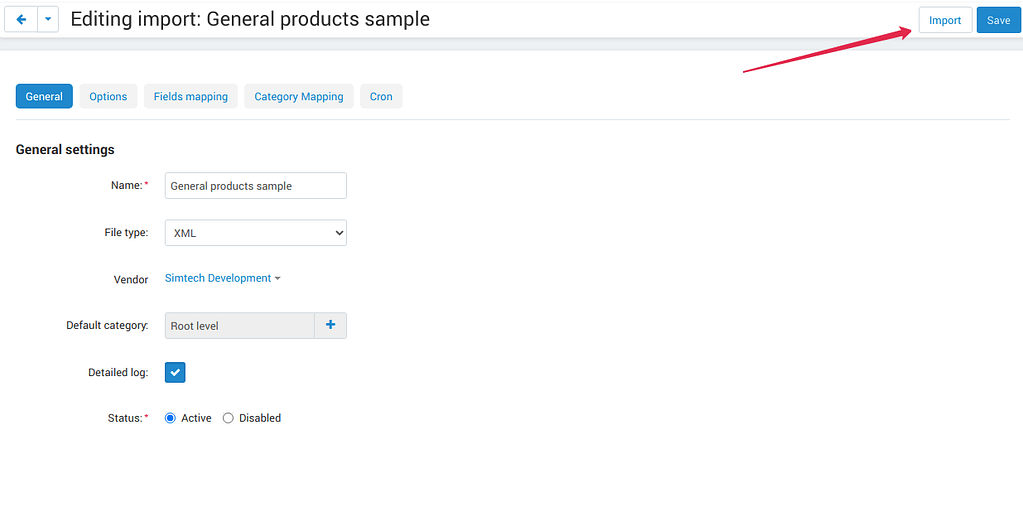
- Save the changes and click the Import button to run import.
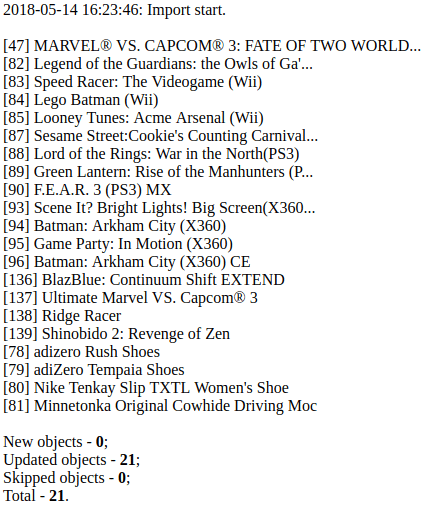
The import process may take some time. You will see the result once it’s complete.
Cloning import profiles
The ability to clone import profiles will save you time on setting up profiles with similar settings.
To clone an import profile:
- Go to Add-ons > XML and CSV import.
- Select the profile you want to clone and hover the mouse pointer over it. Click the gear button and select Clone.
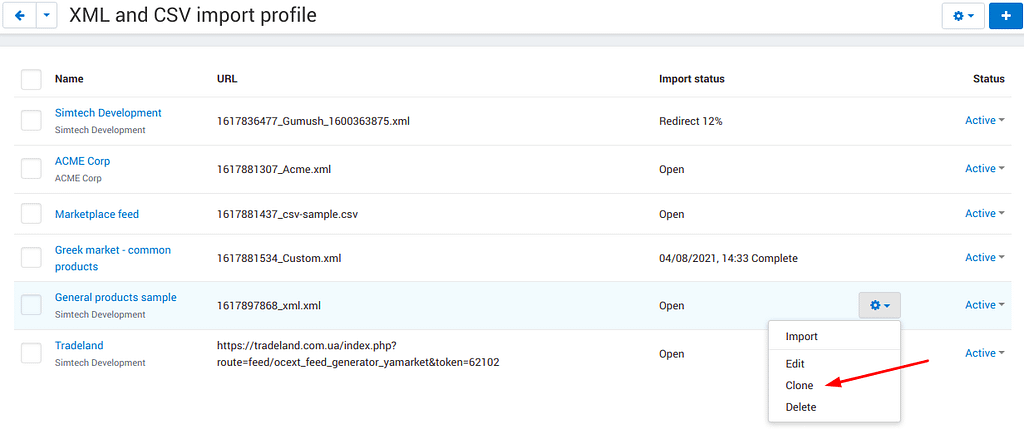
- The profile will be cloned and you will be redirected to the editing import profile page where you can adjust the import profile the way you need.
- Click Save.
Common Products add-on Adaptation
The add-on is compatible with the standard add-on Common Products by default.
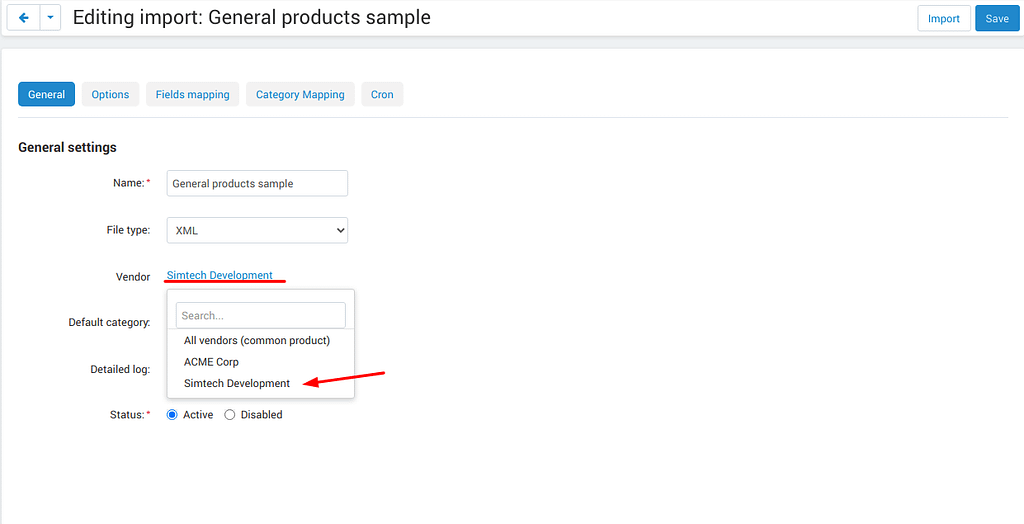
In order to import products, assigning them common for the marketplace, you need to go through the following steps:
- Log in as an administrator of the marketplace
- Open the import preset settings
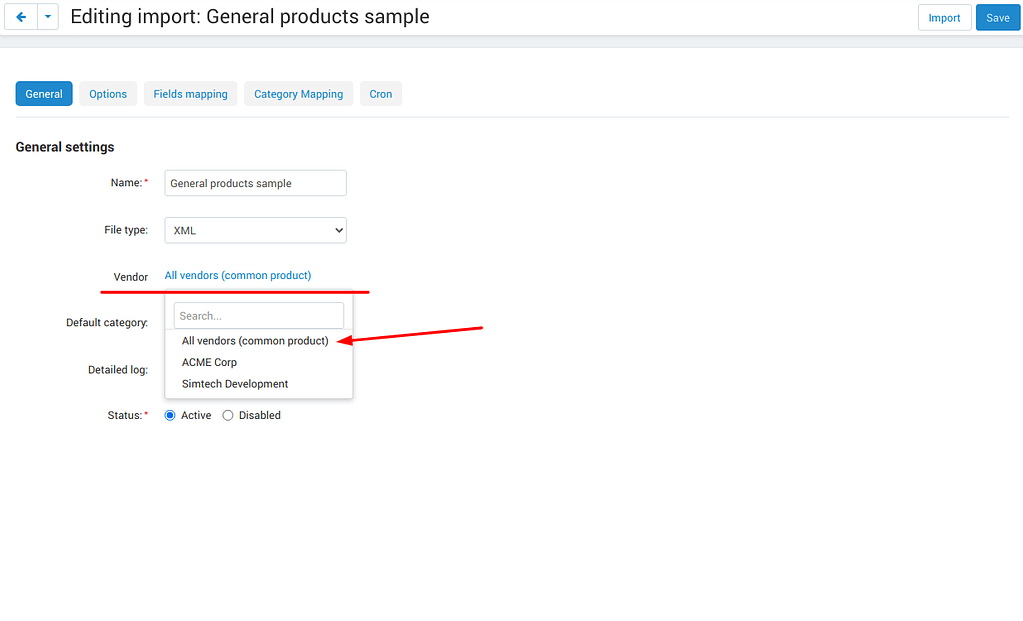
- Select All vendors (common products) in the Vendor field on the General settings tab
After that the selection of the importing product to sell will be available for the Vendor’s administrators:
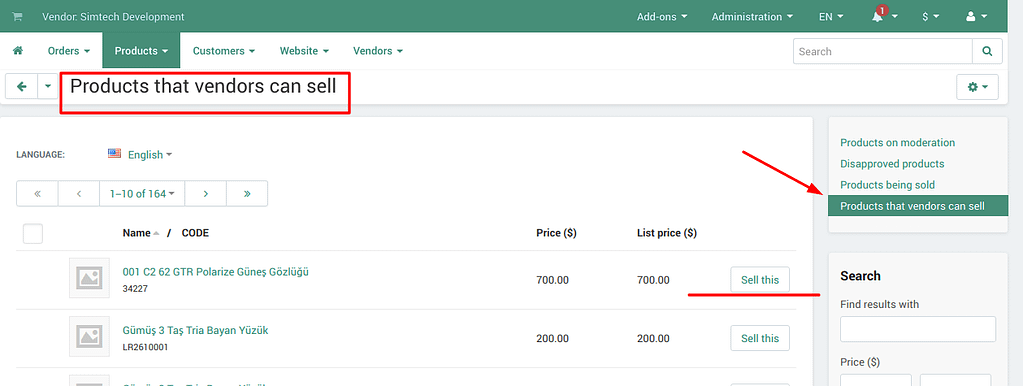
In order to update the common product for particular vendor as an administrator, the product needs to be selected on the General setting tab of the import preset.
By so doing all the products sold by the vendor will be updated.
NOTE! Products won’t be updated, if the vendor doesn’t sell them (Sell this option hasn’t been selected).
Allowing/forbidding administrators to manage import
To allow/forbid administrators/managers to manage import, follow these steps:
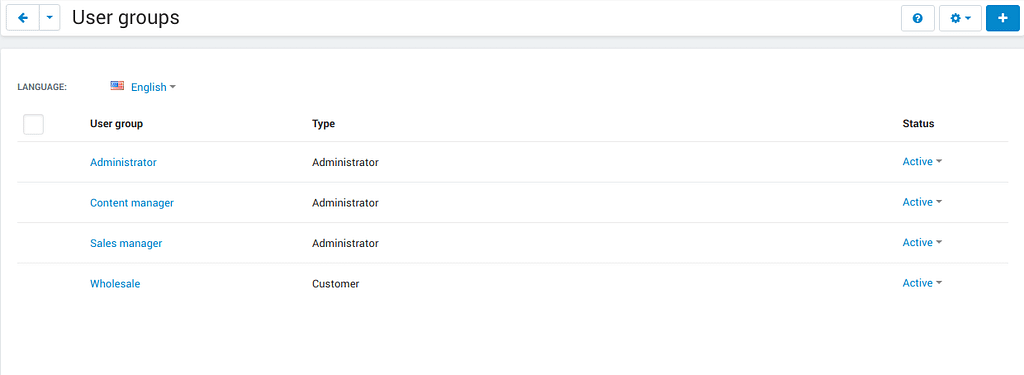
- Go to Customers > User groups.
- Select an existing group or create a new one.
- Switch to the Privileges tab and find the Product privileges field.
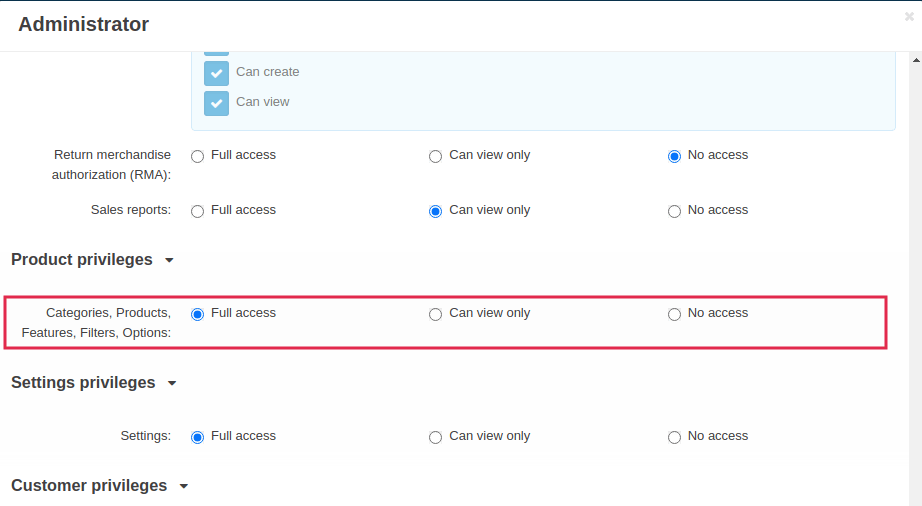
If select the Full access for this privilege, administrators of this user group will have access to import functionality, i.e. they will be able to view, edit and start import.
If you select Can view only or No access option, administrators of this user group will NOT have access to import functionality, i.e. they will NOT be able to view, edit or start import.
Advanced Import Comparison
Comparison table
| Advanced products import | XML & CSV Import Pro | |
|---|---|---|
| File import Format | XML, CSV | XML, CSV, YML, JSON |
| Support of the XML container format | No | Yes |
| Common products add-on compatibility | No | Yes |
| Import by vendor ability | No | Yes |
| Primary fields setup | Product code obligatory field | Primary field can be mentioned, and additional field can be selected;Select the primary fields check:All: Selection is performed for primary and additional fields simultaneouslyCascade: Selection is performed for the primary field first, and then for the additional field |
| Modificators | Yes | Yes |
| Category mapping | No | Yes |
| Automatic category mapping | No | Yes |
| Characteristic mapping | No | Yes |
| Options mapping | Yes | Yes |
| Currency conversion while importing | No | Yes |
Productivity Comparison
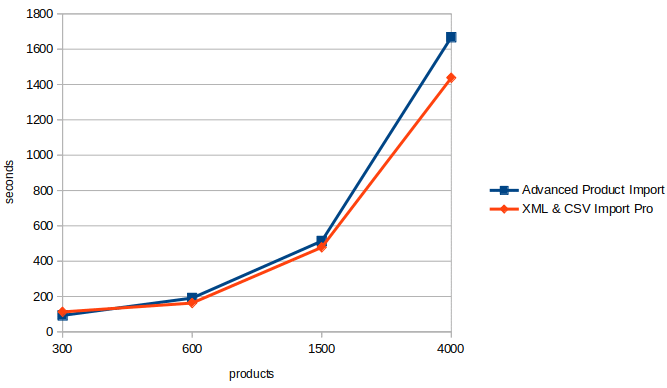
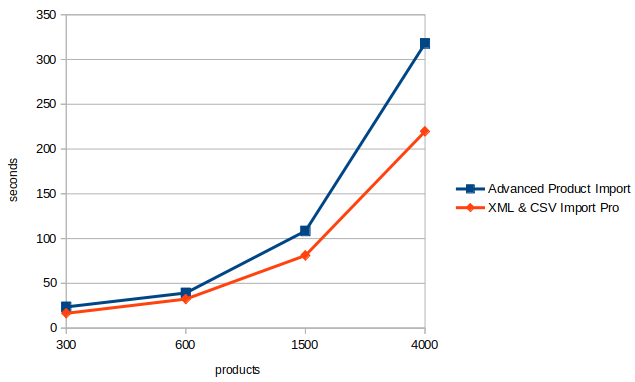
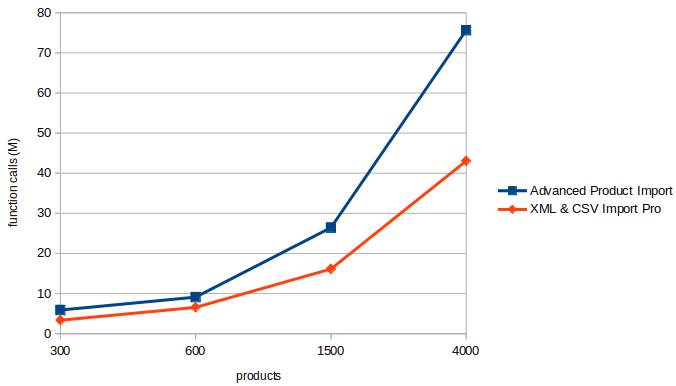
Case 1: file №18 from Test-cases article File type: CSV
Modification:
- the column is added for the first row (client’s file is invalid)
Mapping:
| Article number | Product code |
| Short description invoice | Product name |
| Short description catalogue | Short description |
| Long description content | Description |
| Advised salesprice | Price |
| Image | Detailed image |
Case 1.1: the row amount is limited to 300, import via cron
| Advanced Product Import | XML & CSV Import Pro | |
|---|---|---|
| Total Incl. Wall Time (microsec): | 93,131,315 | 112,660,111 |
| Total Incl. CPU (microsecs): | 23,683,029 | 16,538,388 |
| Total Incl. MemUse (bytes): | 144,925,800 | 205,188,120 |
| Total Incl. PeakMemUse (bytes): | 145,820,968 | 205,276,528 |
| Number of Function Calls | 5,879,125 | 3,356,027 |
Case 1.2: row amount is limited to 600, import via cron
| Advanced Product Import | XML & CSV Import Pro | |
|---|---|---|
| Total Incl. Wall Time (microsec): | 191,184,957 | 163,016,898 |
| Total Incl. CPU (microsecs): | 39,270,405 | 32,447,672 |
| Total Incl. MemUse (bytes): | 269,030,024 | 384,054,496 |
| Total Incl. PeakMemUse (bytes): | 270,492,568 | 384,054,496 |
| Number of Function Calls | 9,110,713 | 6,561,605 |
Case 1.3: row amount is limited up to 1500, import via cron
| Advanced Product Import | XML & CSV Import Pro | |
|---|---|---|
| Total Incl. Wall Time (microsec): | 513,722,647 | 478,230,797 |
| Total Incl. CPU (microsecs): | 108,496,085 | 81,144,255 |
| Total Incl. MemUse (bytes): | 637,788,472 | 915,507,712 |
| Total Incl. PeakMemUse (bytes): | 637,788,472 | 915,596,120 |
| Number of Function Calls | 26,428,698 | 16,122,599 |
Case 1.4.: row amount is limited to 4000, import via cron
| Advanced Product Import | XML & CSV Import Pro | |
|---|---|---|
| Total Incl. Wall Time (microsec): | 1,667,661,362 | 1,437,923,564 |
| Total Incl. CPU (microsecs): | 317,876,318 | 219,683,250 |
| Total Incl. MemUse (bytes): | 1,668,562,536 | 2,392,049,424 |
| Total Incl. PeakMemUse (bytes): | 1,676,950,008 | 2,392,137,832 |
| Number of Function Calls | 75,641,126 | 43,052,215 |
Results:
- Total Incl. Wall Time (lesser is better)
- Total Incl. CPU (lesser is better)
- Number of Function Calls (lesser is better)
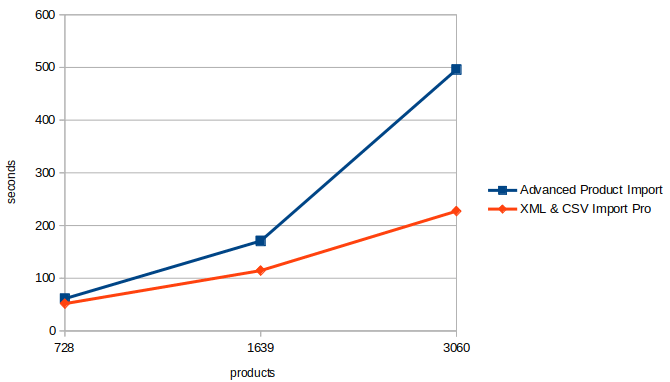
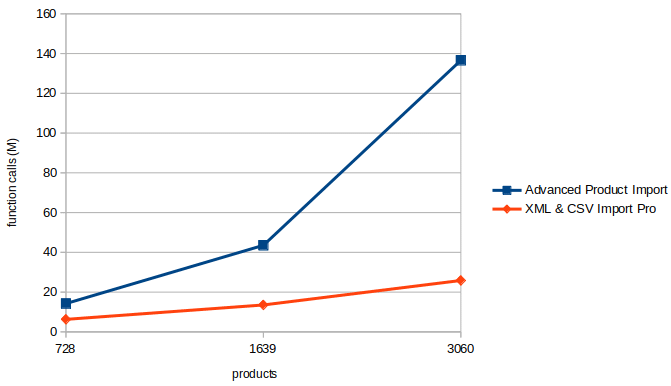
Case 2: file №24 from the Test-cases article (“light“ import, without images)
File type: XML
File was not altered
For Advanced Product Import xml target = producten/product
Mapping (for instance, not real mapping):
| productid | Product Code |
| productnr | Product Name |
| qty | Quantity |
Case 2.1: 728 products, via console
| Advanced Product Import | XML & CSV Import Pro | |
|---|---|---|
| Total Incl. Wall Time (microsec): | 61,198,583 | 51,684,746 |
| Total Incl. CPU (microsecs): | 50,625,993 | 32,199,606 |
| Total Incl. MemUse (bytes): | 200,981,832 | 427,060,648 |
| Total Incl. PeakMemUse (bytes): | 202,698,296 | 427,136,416 |
| Number of Function Calls | 14,215,435 | 6,279,150 |
Case 2.2: 1639 products, via console
| Advanced Product Import | XML & CSV Import Pro | |
|---|---|---|
| Total Incl. Wall Time (microsec): | 170,711,663 | 114,490,443 |
| Total Incl. CPU (microsecs): | 146,321,976 | 69,560,375 |
| Total Incl. MemUse (bytes): | 415,394,144 | 898,464,784 |
| Total Incl. PeakMemUse (bytes): | 418,834,640 | 898,540,176 |
| Number of Function Calls | 43,526,687 | 13,512,969 |
Case 2.3: 3060 products, via console
| Advanced Product Import | XML & CSV Import Pro | |
|---|---|---|
| Total Incl. Wall Time (microsec): | 495,997,936 | 227,342,864 |
| Total Incl. CPU (microsecs): | 441,090,100 | 134,658,053 |
| Total Incl. MemUse (bytes): | 776,231,624 | 1,707,308,776 |
| Total Incl. PeakMemUse (bytes): | 782,933,608 | 1,707,388,464 |
| Number of Function Calls | 136,597,564 | 25,844,694 |
Results:
- Total Incl. Wall Time (lesser is better)
- Total Incl. CPU (lesser is better)
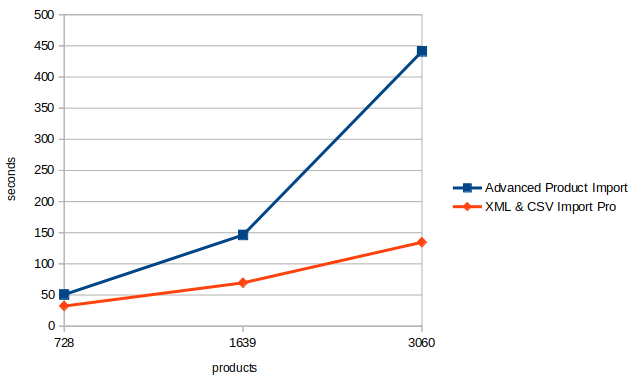
- Number of Function Calls (lesser is better)
How to set up a cron job in cPanel
Cron Jobs are used for scheduling tasks to run on the server.
To create a cron job, complete the following steps:
- Select Cron Jobs in cPanel.
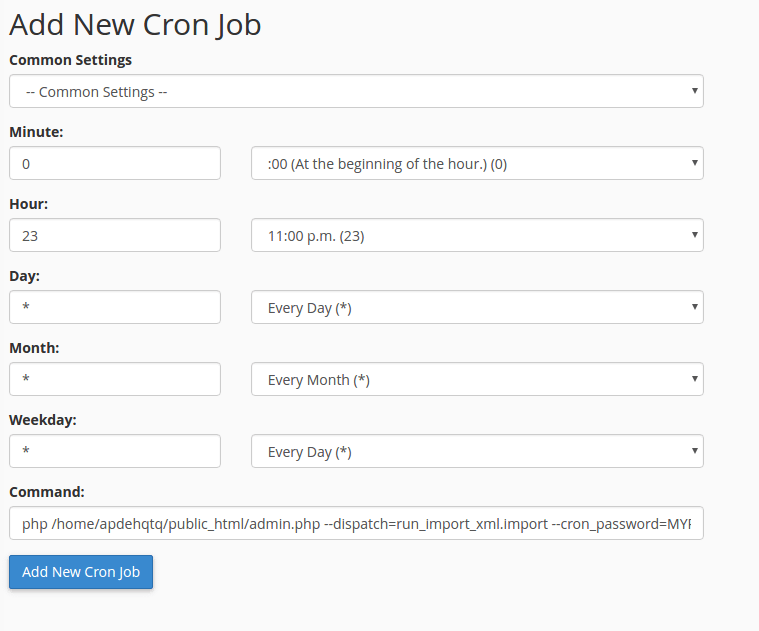
- Fill in the form to create a cron job. Specify when the cron job should be executed. In the Command field, enter the command that will execute the cron script. You can find it in the add-on settings. Do not forget to specify the path to your store.
The cron in the image below will run every day at 11:00PM.

For more details, refer to cPanel Documentation.