Today, we would like to talk about how to set up an online store with the installation of the CS-Cart shopping cart software. CS-Cart is rather easy to install, but if you prefer to do it on your own, you need to learn some terms and some details about the installation process.
To setup an online store with CS-Cart, follow these four steps.
Step 1: Running software on your local computer
For the initial settings, we recommend that you install CS-Cart on your local computer. You will download the products, safely experiment with the settings and design, and then transfer your perfect results into production.
First, you will need to install a virtual web server on your machine. CS-Cart is a model server-side software program that requires you to create a suitable web server environment including an HTTP server, a PHP interpreter, and a MySQL database.
To install the web server environment, download the free web server package. CS-Cart developers recommend that you use XAMPP. It is a general application that works with OS X, Windows, or Linux operating systems. If you prefer, you can also use Denver (Windows), LAMP (Linux), or MAMP (OS X) instead of XAMPP. You could also use virtual servers like Apache and IIS, but they require complex settings for advanced users.
After the virtual web server is installed, it is time to download the latest version of the CS-Cart software and extract the files to a workspace of your web server. The CS-Cart Installation Wizard will guide you through the entire installation process.
It has to be said some words about MySQL. MySQL is the most popular database system that is used with PHP. It runs on a server and it helps store, connect to, and manipulate your website data. CS-Cart uses MySQL to store your online store’s data on your web server.
Every web server listed above includes MySQL, so you don’t need to install it. The CS-Cart Installation Wizard will create a MySQL database by default. You just have to confirm your database name, user account, and password.
Step 2: Setting up a store
CS-Cart comes with a convenient post-installation Settings Wizard that makes basic store setup easy and clear. Simply run the Settings Wizard to setup your online store. All the necessary store settings will be done by default.
Now, you need to customize your store. Don’t forget to:
- Create categories and product pages;
- Setup payment methods (individual settings are required for every method);
- Setup shipping methods;
- Customize the look & feel of your store;
- Install out-of-the-box add-ons (like SEO, Comments and Reviews, or Bestsellers).
Step 3: Choosing a domain name and hosting provider

When the store is ready on your computer, it is time to find a web hosting provider.
The web server you choose must support PHP version 5.3 to 5.4; MySQL version 4.1 or greater (MySQLi or pdo_mysql must be supported).
It’s preferred that the hosting provider service also enables your to access an installed GD library; cURL support; Phar extension; file_uploads; Apache mod_headers; and an .htaccess file (should allow the following directives: DirectoryIndex, Deny, Allow, Options, Order, AddHandler, RewriteEngine, RewriteBase, RewriteCond and RewriteRule).
You can find a list of compatible hosting providers on the official CS-Cart website. Our review of compatible hosting service providers is forthcoming.
To avoid possible problems, we recommend that you register a domain name for your website through the provider you select to host your online store.
Step 4: Migration to a web server
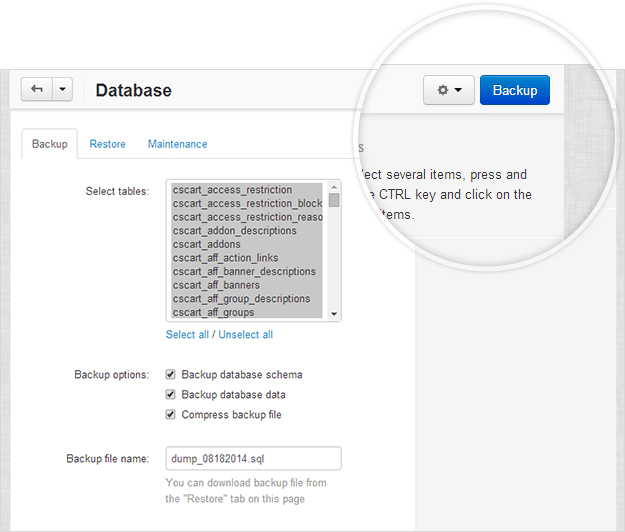
First, you will have to back up your store’s database (Admin panel –> Administration –> Database –> Backup). Then, you should pack all the store files onto your computer in one archive.


Using Hosting File Manager, you will extract the file archive to the web server directory and set the proper file permissions.
Then, we recommend that you repeat the CS-Cart installation to the web server using the CS-Cart Installation Wizard. The MySQL database will be created by default. You only need to go to the dashboard of your store (Administration –> Database) and restore your database.
It’s that simple. Your online store is ready to use. Start promoting and selling.
__________________________________________________________________________
Follow us on Twitter and Facebook to get fresh information about CS-Cart Tutorials.
